

El post anterior sobre cómo usar un keypad como un teclado completo era, como ya comenté, la primera iteración de un proyecto nuevo con el que me he puesto hace nada. Iba a trabajar de forma incremental e ir subiendo cada parte nueva como una entrada independiente del blog, pero me vine arriba y acabé todo el código en cuatro días.
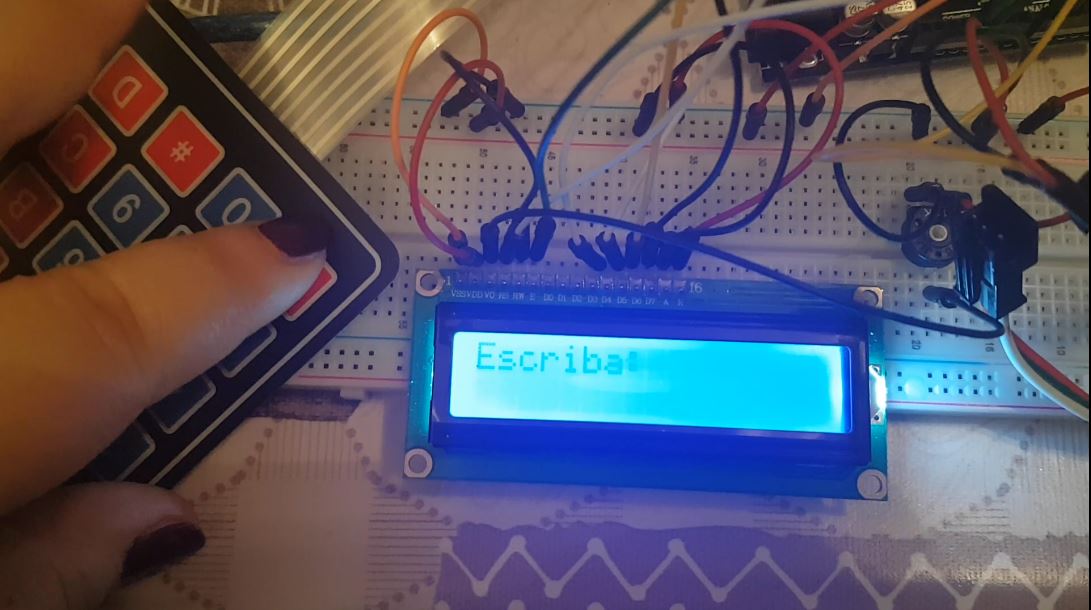
El proyecto es un panel de LEDs que muestre un mensaje de texto. El mensaje de texto es personalizable y se introduce mediante un keypad programado como un teclado de móvil antiguo, y en una pantallita LCD se puede ver el texto que se va escribiendo – en caso de que haya erratas o se quiera modificar el texto mientras se escribe -.
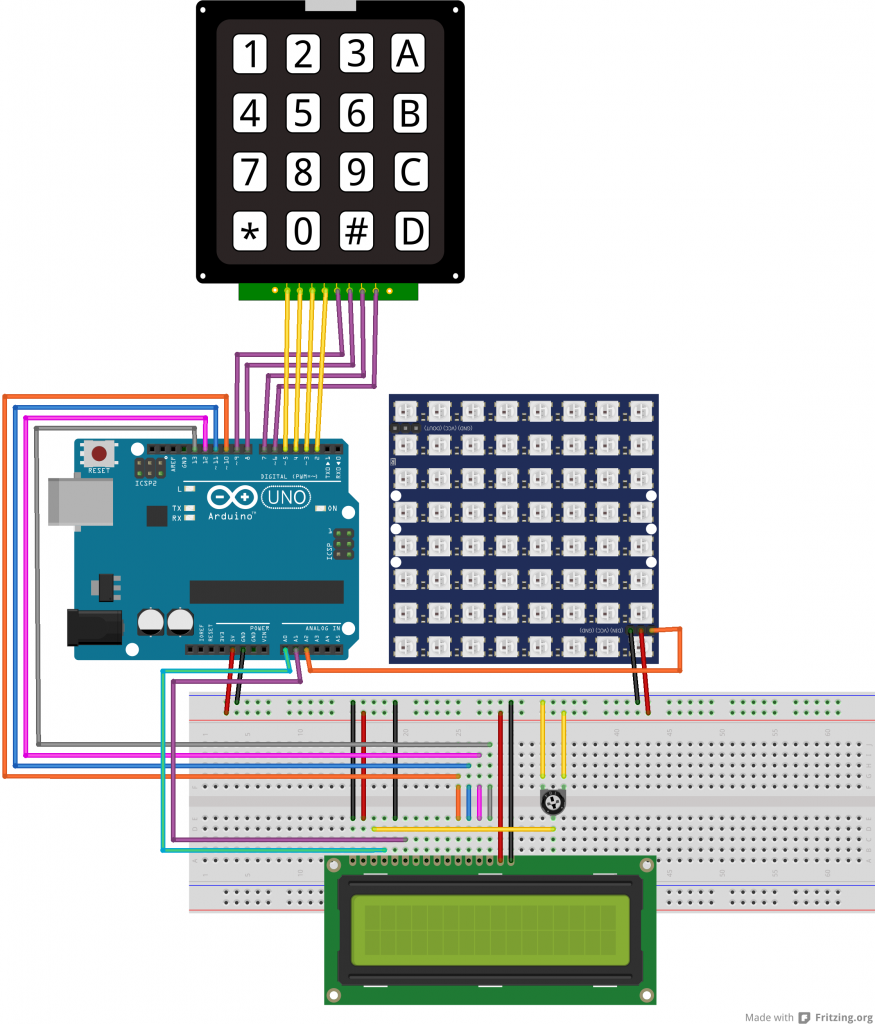
El circuito tiene tres componentes: un keypad, una matriz de LEDs WS2812B, y una pantalla LCD (y un potenciómetro de 10k que no sé realmente qué hace pero es necesario para poder ver el texto en la pantalla. Algo de controlar el brillo, creo).
Sé que hay pantallas LCD que usan menos pines (y que no necesitan potenciómetro), pero esta era la que me venía en el kit de iniciación, y ya que la tengo la aprovecho.
El esquema parece complicado porque tiene muchísimas conexiones, pero casi todas son directas del puerto del arduino al puerto del componente:
Sobre el circuito:
Como he dicho, la conexión de los componentes es cuestión de mirar cómo se conectan y tirar cable del arduino al componente. He tenido que usar puertos analógicos porque me he quedado sin digitales, de la cantidad de conexiones que usan tanto el keypad como la pantalla LCD, pero ese ha sido el mayor problema. Las conexiones vienen explicadas en cualquier post sobre pantalla LCD o keypad que se conecten a un arduino (y también tienen sus propias bibliotecas, casi me da verguenza decir que “yo” he programado algo).
El código, que junta el comportamiento del keypad como un teclado completo, el mostrar texto por pantalla, y el mostrar texto por el panel LCD, me ha quedado así:
#include <Keypad.h>

#include <LiquidCrystal.h>
#include <Adafruit_GFX.h>

#include <Adafruit_NeoMatrix.h>

#include <Adafruit_NeoPixel.h>

#ifndef PSTR

#define PSTR // Make Arduino Due happy

#endif
// KEYPAD DECLARATIONS

const byte ROWS = 4; //four rows

const byte COLS = 4; //three columns

char keys[ROWS][COLS] = {

  {'1', '2', '3', 'A'},

  {'4', '5', '6', 'B'},

  {'7', '8', '9', 'C'},

  {'*', '0', '#', 'D'}

};

// pins connected to the keypad

byte rowPins[ROWS] = {5, 4, 3, 2};

byte colPins[COLS] = {9, 8, 7, 6};
/*

 * matrix corresponding the letters with each of the buttons of the keypad

 * The buttons '*' and 'D' are not mapped, since the are reserved for another function

*/

char letters[14] [4] = {

  {'0', ' ', '0', ' '},

  {'a', 'b', 'c', '1'},

  {'d', 'e', 'f', '2'},

  {'g', 'h', 'i', '3'},

  {'j', 'k', 'l', '4'},

  {'m', 'n', 'o', '5'},

  {'p', 'q', 'r', '6'},

  {'s', 't', 'u', '7'},

  {'v', 'w', 'x', '8'},

  {'y', 'z', '9', '9'},

  {',', '.', '-', ':'},

  {'(', ')', '?', '!'},

  {'@', '+', '=', '#'}

};
Keypad keypad = Keypad( makeKeymap(keys), rowPins, colPins, ROWS, COLS );
// variables to keep track of the keys pressed, the letters, and the text on the LCD screen

long latter_time;

long difference;

bool endtext = false;

bool writing = false;
char last_key_pressed = ' ';

byte num_times_pressed = 0;

char last_character = ' ';
const char nullchar = '\0';

String text = "";

String textonscreen = "";
// LCD SCREEN DECLARATIONS

LiquidCrystal lcd(A0, A1, 10, 11, 12, 13);
// LED PANEL DECLARATIONS
// output pin connecting to the LED panel

#define PIN A2
Adafruit_NeoMatrix matrix = Adafruit_NeoMatrix(32, 8, PIN,

                            NEO_MATRIX_TOP     + NEO_MATRIX_LEFT +

                           NEO_MATRIX_ROWS + NEO_MATRIX_ZIGZAG,

                           NEO_GRB            + NEO_KHZ800);
const uint16_t colors[] = {

  matrix.Color(245, 16, 203), matrix.Color(255, 64, 64), matrix.Color(255, 193, 193)

};
// Variables to keep track of the text displacement in the LED panel

int x;

int pass;

const int  pixelPerChar = 6;
void setup() {

  Serial.begin(9600);

  // set the analog pins to digital for the LCD screen and LED panel connections

  pinMode(A0, OUTPUT);

  pinMode(A1, OUTPUT);

  pinMode(PIN, OUTPUT);

  // set up the LCD's number of columns and rows:

  lcd.begin(16, 2);

  // Add an event listener for the keypad

  keypad.addEventListener(keypadEvent);

  // Initialize LED panel

  matrix.begin();

  matrix.setTextWrap(false);

  matrix.setBrightness(15);

  matrix.setTextColor(colors[0]);

}
void loop() {

  char key = keypad.getKey();

  // if text is not being received via the keypad, it is shown constantly on the LED panel

  if (!writing) {

    writeTextOnLEDPanel();

  }

  // when the input text is completed the LCD screen is reset.

  if (endtext) {

    lcd.clear();

    lcd.setCursor(0, 0);

    lcd.noBlink();

    lcd.print("Mostrando texto");

    endtext = false;

  }

}
void writeTextOnLEDPanel() {

  int maxDisplacement;

  matrix.fillScreen(0);

  matrix.setCursor(x, 0);

  matrix.print(text);

  /*

 * Calculate the maximum displacement based on font width, screen width and text length.

 * If you use the standard font of Adafruit_GFX it is 6px per character.

  */

  maxDisplacement = text.length() * pixelPerChar;

  if (--x < -maxDisplacement) {

    x = matrix.width();

    if (++pass >= 3) pass = 0;

    matrix.setTextColor(colors[pass]);

  }

  matrix.show();

  delay(100);

}
// the event triggered when a keypad key is pressed emulates old sms writing

void keypadEvent(KeypadEvent key) {

  switch (keypad.getState()) {

    case PRESSED:

      if (writing) {

        switch (key) {

          case '#':

            // '#' sets the end of the text.

            setEndInputText();

            resetLEDPanel();

            break;

          case '*':

            //does nothing

            break;

          case 'D':

            // 'D' is the 'delete las character' key

            deleteLastChar();

            break;

          default:

            simulateKeyboard(key);

        }

      } else {

        if (key == '*') {

          writing = true;

          resetStartWriting();

        } else {

         showPressCorrectKeyText();

        }

      }

      break;

  }

}
void setEndInputText() {

  text += last_character;

  endtext = true;

  writing = false;

}
void resetLEDPanel() {

  x = matrix.width();

  pass = 0;

}
void deleteLastChar() {

  last_key_pressed = 'D';
  lcd.setCursor(textonscreen.length() - 1, 1);

  lcd.print(' ');
  last_character = text[text.length() - 1];

  text = text.substring(0, text.length() - 1);

  textonscreen = textonscreen.substring(0, textonscreen.length() - 1);
  showLCDTextInProgress(false);

}
void simulateKeyboard(char key) {

  byte indice = getIndice(key);
  if (key == last_key_pressed) {

    /* If the same key is pressed several times, with an interval of less than 2 seconds,

 * it is considered "looking for the next character".

 * If the interval is of more than 2 seconds, it is considered a new character

    */

    difference = millis() - latter_time;

    latter_time = millis();
   if (difference > 2000) {

     text += last_character;

     last_character = letters[indice][0];

     num_times_pressed = 1;

     showLCDTextInProgress(true);

    } else {

      last_character = letters[indice][num_times_pressed % 4];

      num_times_pressed++;

      showLCDTextInProgress(false);

    }

  } else {

    last_key_pressed = key;

    if (last_character != nullchar) {

      text += last_character;

    }

    last_character = letters[indice][0];

    num_times_pressed = 1;

   showLCDTextInProgress(true);

    latter_time = millis();

  }

}
void showLCDTextInProgress(bool newkey) {

  lcd.setCursor(0, 1);}

  if (text.length() <= 14 && last_character != nullchar) {}

    textonscreen = text + last_character;}

  } else {}

    if (newkey) {}

      textonscreen = textonscreen.substring(1, textonscreen.length()) + last_character;}

    } else {}

      textonscreen = textonscreen.substring(0, textonscreen.length() - 1) + last_character;}

    }}

  }}

  lcd.print(textonscreen);}

  lcd.blink();}

}}
byte getIndice(char key) {}

  byte indice;}

  /* For keys A, B, C and D, corresponding positions 10 to 14 of the keys array, }

 * the way of calculating the index is, when converting to integer,}

 * substracting the ASCII corresponding to '7', that leaves A as 10, B as 11, and so on.}

  */}

  if (key > '9') {}

    indice = key - '7';}

  } else {}

    indice = key - '0';}

  }}

  return indice;}

}}
void resetStartWriting() {}

  text = "";

  textonscreen = "";

  last_character = nullchar;

  endtext = false;

  lcd.clear();

  lcd.print("Escriba:");

  lcd.setCursor(1, 0);

}
void showPressCorrectKeyText() {

  lcd.setCursor(0, 0);

  lcd.print("* para escribir");

}
El repositorio con el código lo podéis encontrar aquí.
Sobre el código:
El comportamiento del keypad es el explicado en el post anterior, así que de eso no comento nada. Solo que he ordenado el código para que se lea más fácilmente, porque ya empezaba a tener una longitud que hacía difícil leerlo.
El programa registra el pulsado de teclas en el keypad. Si se pulsa ‘*’ comienza a “recibir” caracteres para montar el texto que se mostrará por pantalla al pulsar ‘#’. La tecla ‘D’ la he reservado para borrar el último carácter escrito.
Si mientras se está mostrando el texto en el panel de LEDs se pulsa alguna letra que no sea ‘*’, la pantalla LCD muestra un mensaje avisando de que si quieres escribir un mensaje nuevo debes pulsar ‘*’. Al arrancar el arduino hay que introducir el texto de nuevo cada vez, porque aún no sé cómo almacenar variable en la memoria no volátil – esto si lo modifico lo pondré en el blog también -.
Me siento especialmente orgullosa de cómo el texto que se introduce se va deslizando a la izquierda si el número de caracteres sobrepasa el tamaño de la pantalla (método showLCDTextInProgress).
El texto se muestra de forma ininterrumpida, pero alternando entre tres colores. Tanto el número de colores como los colores en sí (en vector “colors“) se pueden modificar. Los colores en la declaración del vector, y el número – además de en el propio vector – cambiando el literal de la instrucción if (++pass >= 3) pass = 0; del método “writeTextOnLEDPanel” de un 3 al tamaño que sea.
Y salvo explicar el comportamiento, pienso que el código es bastante autoexplicativo.
************************************************************
Espero que esta entrada pueda ser de utilidad, y si no, como siempre, aquí tenéis un gato para compensar.